Ian, I just used an old cardboard box cut up and duct taped together. I then used that as a pattern for my hardboard. I will be using smooth two sided 1/8" tempered Masonite (hardboard). The none tempered stuff is no good for me (not worth the time to redo it). I believe that no two Carryalls are the same when it comes to those details. The three I have are all different by about 1/4" or so. I also don't think Dodge put too much thought into the fit and slope of the rubber ring that goes into the top channel. I used a spacer, and had to use some filler rod metal in some spots to get the space even. Now it is the correct space to handle the rubber ring as well as an appropriate slope from clip to roof edge.
Gordon, I have your ROOF page saved, but I have a question on the slope or curve of the roof supports. My supports have a curve in them all ready. Do I need anymore slope? With the hardboard in place I have a VERY noticeable slope, do I need more? There are no pictures showing the exact rails without the roof all ready in place.
As for the lead advise....I use "Stay Clean" liquid flux, (acid) I got mine at a local welding store, after buying the small bottle and using all of it, I stepped up to the gallon jug. (on line, welding supply) The lead I use is a 70/30. 70 lead/30 tin, I don't buy the expensive stuff from Westwood.... The rods I use are 5/8" round and about 16-18" long. I get them out of Oregon. I will be making my own after this project. As for the bleed through?? I have never had that problem, but I will say make sure the area is tinned before the lead is applied. The lead will not stick to a none tinned area. When you tin your metal don't use the tinning butter crap that some of these companies try to sale to you. The acid and lead will do that for you. I got a lead solder DVD online for 30 or 40 bucks, it was the best money I ever spent on the Dodge project. I also have a good supply of s/s wire brushes, make sure you use the ones that have the wood handles, or you might have a flaming torch in your hand. Then you have to clean the melting, burning plastic off your project. Lead work is easy, but just do it right.
Brain, you make me laugh.
James
My WC-53 project
-
WC4DOOR
- Sergeant

- Posts: 152
- Joined: Tue Jul 20, 2010 3:12 am
- My garage: 1942 WC-53
1943 WC-53-4DOOR
1942 WC-53
And one more WC-53 - Location: Salt Lake City
Re: My WC-53 project
1942 WC 53
1943 WC 53 4 Door
an other 1942 WC 53
and one more WC 53
1943 WC 53 4 Door
an other 1942 WC 53
and one more WC 53
-
WC4DOOR
- Sergeant
- Posts: 152
- Joined: Tue Jul 20, 2010 3:12 am
- My garage: 1942 WC-53
1943 WC-53-4DOOR
1942 WC-53
And one more WC-53 - Location: Salt Lake City
Re: My WC-53 project
Brain I mean Brian
1942 WC 53
1943 WC 53 4 Door
an other 1942 WC 53
and one more WC 53
1943 WC 53 4 Door
an other 1942 WC 53
and one more WC 53
-
WC4DOOR
- Sergeant
- Posts: 152
- Joined: Tue Jul 20, 2010 3:12 am
- My garage: 1942 WC-53
1943 WC-53-4DOOR
1942 WC-53
And one more WC-53 - Location: Salt Lake City
Re: My WC-53 project
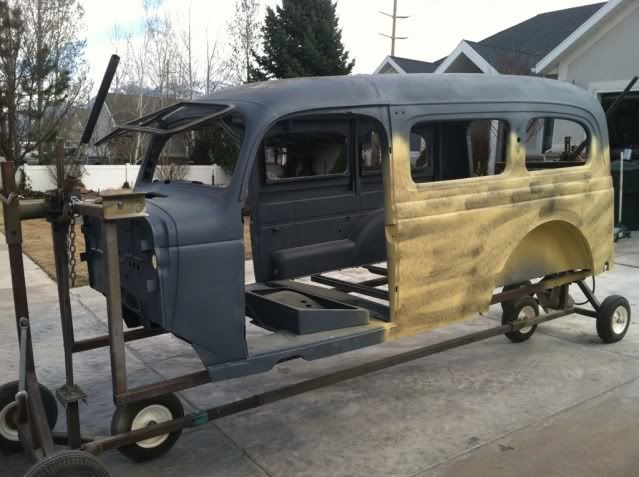
I finally got some primer on. Epoxy dark gray in color. I then put some sandable filler primer, buff color. This is the second coat, with a guide coat in black. The guide coat will let me know how many file marks I have to fill. It blocked out really nice at 220 grit, so I will cross my fingers, and hope this will do it before the sealer. A few more hours blocking it down, and it will have OD #8 on it. I think I'm up to 5 gallons so far. It's time like this when all of the welding, grinding, leading, pays off. Before I know it the body will be back on the frame.
James
1942 WC 53
1943 WC 53 4 Door
an other 1942 WC 53
and one more WC 53
1943 WC 53 4 Door
an other 1942 WC 53
and one more WC 53
-
Gordon_M

- Lieutenant General

- Posts: 2798
- Joined: Wed Mar 08, 2006 1:43 pm
- Location: Falkirk, Central Scotland
- Contact:
Re: My WC-53 project
Afternoon James.WC4DOOR wrote:
Gordon, I have your ROOF page saved, but I have a question on the slope or curve of the roof supports. My supports have a curve in them all ready. Do I need anymore slope? With the hardboard in place I have a VERY noticeable slope, do I need more? There are no pictures showing the exact rails without the roof all ready in place.
James
The problem is the standard rubber roof seal. If you fit it by-the-book, then the rubber sticks up about 1/8" all the way round the edge, so in theory if you park on an absolutely flat surface and it rains you have a nice little lake up there.
I put some curve on the roof bearers so I had it about 3/16" higher in the centre than it was at the edges, to encourage the wet stuff to roll off. If your roof bearers have that sort of curve already you don't need any more, but most Carryall and van roof bearers are flat, or even bent down a little in the middle.
Two more 'rain' points.
1. Extend your side window pocket drain hoses down clear of the double panel - don't let them drain into the double panel void like they did originally.
2. Line the bottom inside of your rear window boxes with putty, formed into a channel, and leading to the drain point. Save a lot of rainwater getting onto your rear floor.
Gordon
Gordon, in Scotland
( Now officially given up on any form of politics )
( Now officially given up on any form of politics )
-
WC4DOOR
- Sergeant
- Posts: 152
- Joined: Tue Jul 20, 2010 3:12 am
- My garage: 1942 WC-53
1943 WC-53-4DOOR
1942 WC-53
And one more WC-53 - Location: Salt Lake City
Re: My WC-53 project
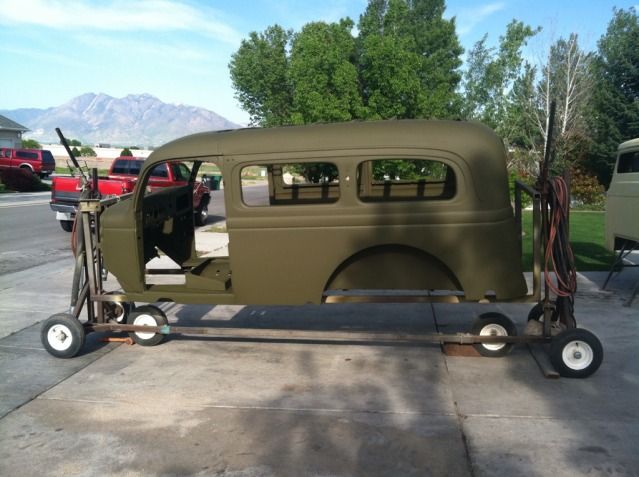
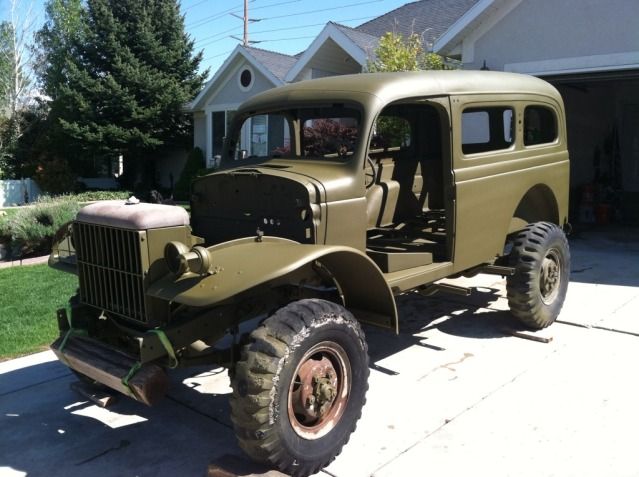
Finally got OD on. I need to pull it off the rotissorie, and touch up a few spots. After I touch it up, I will bolt it down onto the frame. Now all the other parts can be separated and divided unto the three Carryalls. Everything I restore can now be bolted onto the truck, without taking it back off. I do believe the bed wood will be next. I think I'll just cut out three sets of bed wood, and set the other two sets aside until needed.
James
1942 WC 53
1943 WC 53 4 Door
an other 1942 WC 53
and one more WC 53
1943 WC 53 4 Door
an other 1942 WC 53
and one more WC 53
-
WC4DOOR
- Sergeant
- Posts: 152
- Joined: Tue Jul 20, 2010 3:12 am
- My garage: 1942 WC-53
1943 WC-53-4DOOR
1942 WC-53
And one more WC-53 - Location: Salt Lake City
Re: My WC-53 project
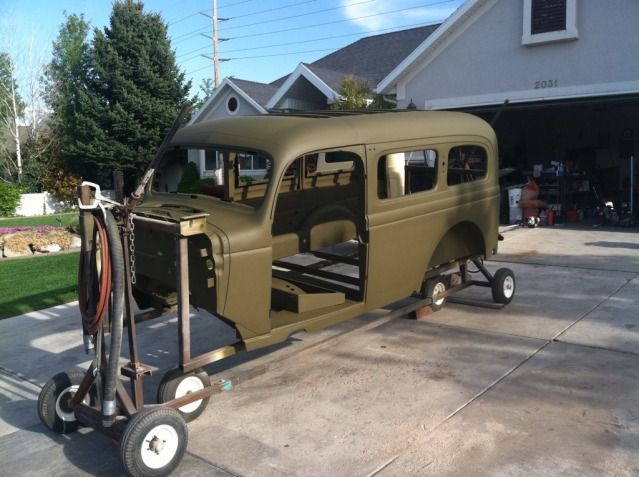
An other picture
1942 WC 53
1943 WC 53 4 Door
an other 1942 WC 53
and one more WC 53
1943 WC 53 4 Door
an other 1942 WC 53
and one more WC 53
-
divingrocks

- Master Sergeant

- Posts: 2559
- Joined: Mon Aug 17, 2009 12:22 pm
- My garage: 1942 WC54 Project
1943 WC54 Donor - Location: Ventura, CA
- Contact:
Re: My WC-53 project
sweet looking carryall...did you use gillespie or tm9 paint?
"Battle is the most magnificent competition in which a human being can indulge. It brings out all that is best; it removes all that is base... The coward is the one who lets his fear overcome his sense of duty. Duty is the essence of manhood."
-
WC4DOOR
- Sergeant
- Posts: 152
- Joined: Tue Jul 20, 2010 3:12 am
- My garage: 1942 WC-53
1943 WC-53-4DOOR
1942 WC-53
And one more WC-53 - Location: Salt Lake City
Re: My WC-53 project
TM9 shade #8. I like the two part catalized urethane, reduced down with xylene. 5.5 gallons so far, but I put two good coats on everything plus a third on the outer surface. I think the six gallons, when reduced, should be all I need.
James
James
1942 WC 53
1943 WC 53 4 Door
an other 1942 WC 53
and one more WC 53
1943 WC 53 4 Door
an other 1942 WC 53
and one more WC 53
-
WC4DOOR
- Sergeant
- Posts: 152
- Joined: Tue Jul 20, 2010 3:12 am
- My garage: 1942 WC-53
1943 WC-53-4DOOR
1942 WC-53
And one more WC-53 - Location: Salt Lake City
Re: My WC-53 project
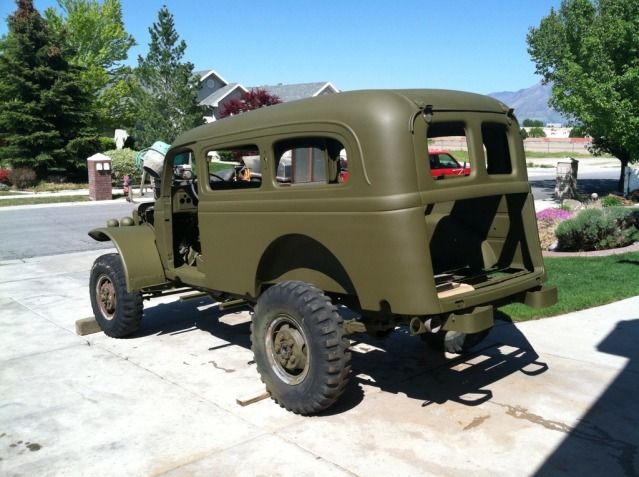
Got the body on. Also gave it a bath to wash off the dust. The paint matches perfect considering it was three different batches.
James
1942 WC 53
1943 WC 53 4 Door
an other 1942 WC 53
and one more WC 53
1943 WC 53 4 Door
an other 1942 WC 53
and one more WC 53
-
WC4DOOR
- Sergeant
- Posts: 152
- Joined: Tue Jul 20, 2010 3:12 am
- My garage: 1942 WC-53
1943 WC-53-4DOOR
1942 WC-53
And one more WC-53 - Location: Salt Lake City
Re: My WC-53 project
An other picture
1942 WC 53
1943 WC 53 4 Door
an other 1942 WC 53
and one more WC 53
1943 WC 53 4 Door
an other 1942 WC 53
and one more WC 53
-
divingrocks
- Master Sergeant
- Posts: 2559
- Joined: Mon Aug 17, 2009 12:22 pm
- My garage: 1942 WC54 Project
1943 WC54 Donor - Location: Ventura, CA
- Contact:
Re: My WC-53 project
I'm not sure, but did it have epoxy two stage paint from the factory or single stage? Anyhow, you are giving Concourse restorations a bad name... 
"Battle is the most magnificent competition in which a human being can indulge. It brings out all that is best; it removes all that is base... The coward is the one who lets his fear overcome his sense of duty. Duty is the essence of manhood."
-
Kiwi
- Sergeant
- Posts: 155
- Joined: Tue Apr 07, 2009 7:35 am
- Location: Wellington. New Zealand
-
billpoe
- Sergeant
- Posts: 190
- Joined: Wed Jan 18, 2012 4:25 am
- Location: Florence Colorado
-
WC4DOOR
- Sergeant
- Posts: 152
- Joined: Tue Jul 20, 2010 3:12 am
- My garage: 1942 WC-53
1943 WC-53-4DOOR
1942 WC-53
And one more WC-53 - Location: Salt Lake City
Re: My WC-53 project
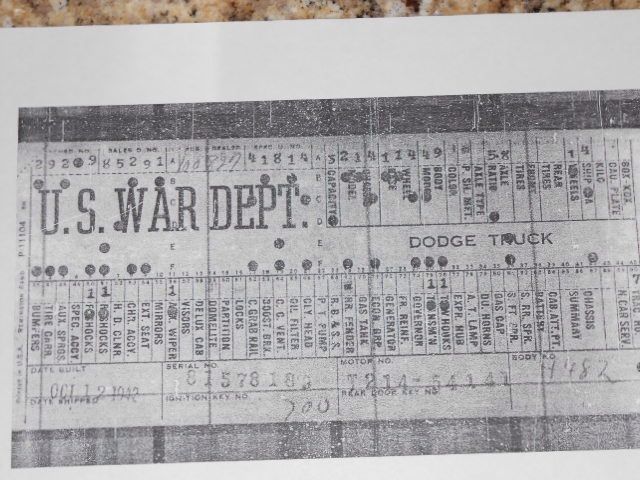
I wanted to say happy birthday to my rig. Vin# 81578189, hood # 20165989. I have a the drivers door yet to do, but after that the drivers side is done. Engine, this winter.
James
1942 WC 53
1943 WC 53 4 Door
an other 1942 WC 53
and one more WC 53
1943 WC 53 4 Door
an other 1942 WC 53
and one more WC 53
-
divingrocks
- Master Sergeant
- Posts: 2559
- Joined: Mon Aug 17, 2009 12:22 pm
- My garage: 1942 WC54 Project
1943 WC54 Donor - Location: Ventura, CA
- Contact:
Re: My WC-53 project
Happy 70th B-day to this carryall....is the engine number 54141 or 54147? Nine days apart from my ambulance!
"Battle is the most magnificent competition in which a human being can indulge. It brings out all that is best; it removes all that is base... The coward is the one who lets his fear overcome his sense of duty. Duty is the essence of manhood."